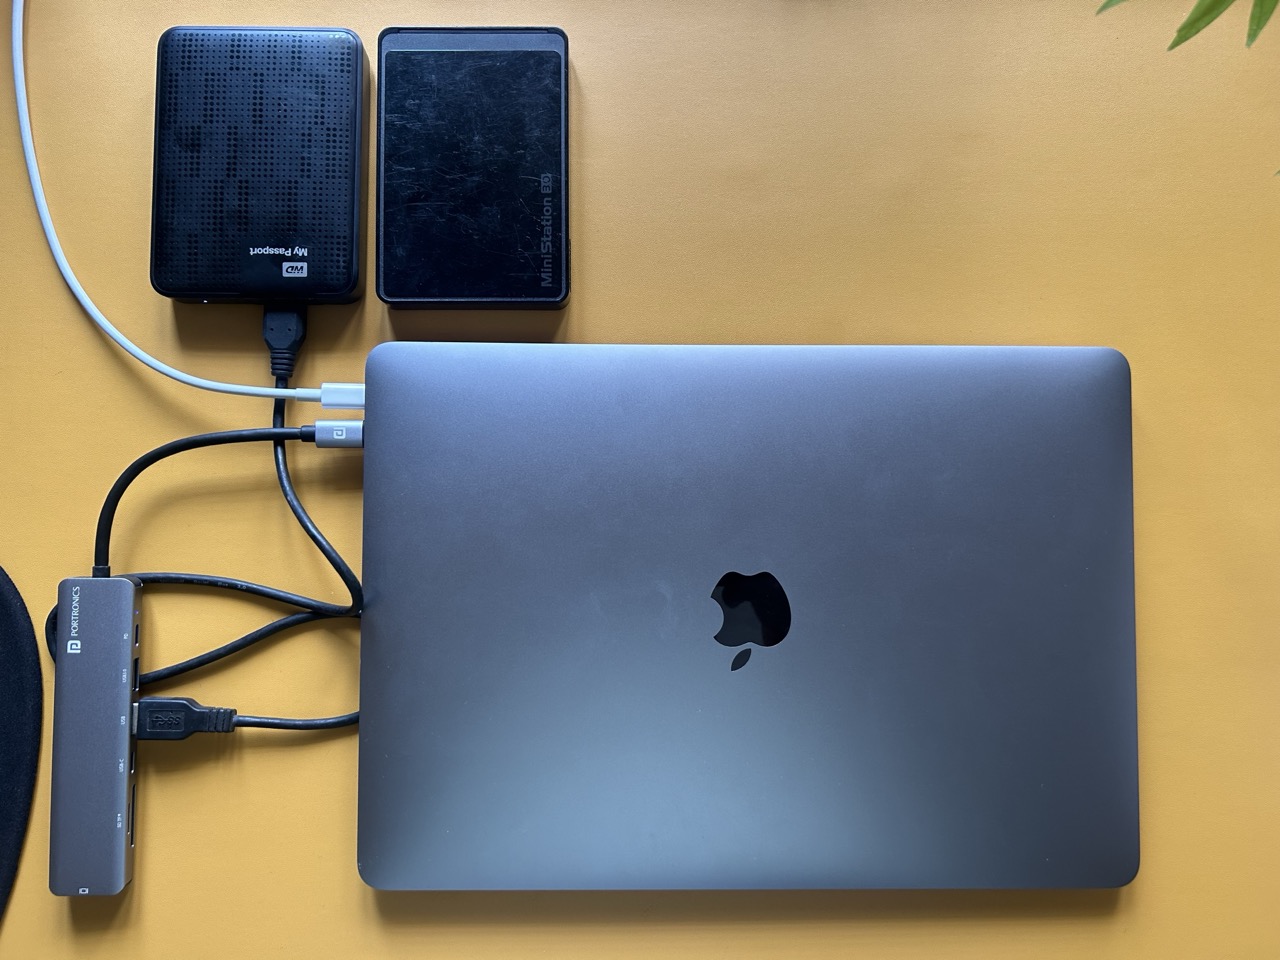
iCloud, Google Drive, Dropbox — they’re convenient, but every file you store there lives on someone else’s server. What if you could have the same seamless sync experience, but with total control over your data, zero monthly fees, and no third-party access? With Nextcloud on an M1 Mac, you can.
This guide walks through turning a MacBook Air M1 and a couple of external USB drives into a fully private, multi-user cloud storage platform — one your household can access from anywhere in the world.
🤔 Why Nextcloud on an M1 Mac?
Apple Silicon Macs are remarkably power-efficient, making them ideal as always-on home servers. The M1 chip sips power even under continuous load, and the fanless design of the MacBook Air keeps it completely silent. Pair that with a couple of affordable 1 TB USB drives and you’ve got serious storage capacity without the cost of a dedicated NAS device.
Nextcloud itself is a mature, open-source platform with a polished web interface, iOS/Android apps, desktop sync clients, calendar, contacts, and more. It genuinely rivals commercial cloud storage — and runs entirely on your hardware.
🗂️ Step 1: Format Your External Drives
Before anything else, get your drives ready for reliable network operation.
Plug your external hard drives (Western Digital, Buffalo, or any USB drive) into your Mac. Open Disk Utility (Cmd + Space, type “Disk Utility”), select each drive from the sidebar and click Erase. Set the format to APFS — Apple’s modern file system built for performance and reliability. For older drives with firmware compatibility issues, Mac OS Extended (Journaled) also works.
⚠️ Warning: Formatting completely erases the drive. Back up anything important first.
😴 Step 2: Stop Your Mac From Sleeping
Your Mac needs to stay awake 24/7 to act as a server. Two things to set up:
First, keep the MacBook plugged in and head to System Settings → Battery → Options. Toggle on “Prevent automatic sleeping on power adapter when the display is off”.
Second, if you want to close the lid and tuck the Mac away on a shelf, run this in Terminal:
sudo pmset -a disablesleep 1
To reverse it later:
sudo pmset -a disablesleep 0
🐳 Step 3: Deploy Nextcloud via Docker
The cleanest way to run Nextcloud on macOS is through the official All-in-One Docker image — it bundles Nextcloud, a web server, database, and everything else into a single managed container.
Install Docker Desktop for Apple Silicon first. Once Docker is running (look for the whale icon in your menu bar), open Terminal and run:
docker run --init --sig-proxy=false \
  --name nextcloud-aio-mastercontainer \
  --restart always \
  --publish 80:80 \
  --publish 8080:8080 \
  --publish 8443:8443 \
  --volume nextcloud_aio_mastercontainer:/mnt/docker-aio-config \
  --volume /var/run/docker.sock:/var/run/docker.sock:ro \
  ghcr.io/nextcloud-releases/all-in-one:latest
Once it’s running, open your browser and go to https://localhost:8080. You’ll find your initial admin password there — copy it and complete the setup wizard.
💾 Step 4: Mount Your External Drives as Nextcloud Storage
By default, Nextcloud stores everything on your Mac’s internal SSD. You want it using your external drives instead. The External Storage Support app makes this straightforward.
- In your Nextcloud dashboard, click your profile icon → Apps.
- Find External Storage Support and click Enable.
- Go to profile → Administration Settings → External Storages (left panel).
- Set the storage type dropdown to Local.
- In the path box, enter the mount path for your drive:
/Volumes/YOUR_DRIVE_NAME_HERE
Repeat for each drive. From here, Nextcloud treats your external USB volumes as primary storage — your Mac’s SSD stays free.
🌍 Step 5: Remote Access — Two Options
This is where it gets interesting. Accessing your Nextcloud from outside your home network requires either a VPN or a tunnel. Here are two solid approaches:
Method A: Tailscale VPN (Easiest, Most Reliable)
Tailscale creates a private mesh network between your devices using WireGuard under the hood. Setup is genuinely five minutes.
- Install the Tailscale client on your M1 Mac and household iPhones.
- Log into all devices with the same Tailscale account.
- On iPhone, make sure Use Exit Node is turned OFF in the Tailscale app.
With Exit Node off, Tailscale uses split tunneling — your normal browsing goes out over your regular internet at full speed, while connections to your Mac’s Tailscale IP (something like http://100.x.y.z:8080) route through the encrypted tunnel. You get secure remote access without slowing anything else down.
Method B: Cloudflare Tunnel (Custom Subdomain, No IP Exposure)
If you want a clean URL like nextcloud.yourdomain.com without exposing your home IP address, Cloudflare Tunnels is the way to go. There’s a catch though: free Cloudflare Tunnels require full nameserver control over a domain, and you probably don’t want to hand over your main domain. The workaround: use a cheap dummy domain.
| Step | What to Do |
|---|---|
| 1. Buy a dummy domain | Get a cheap auxiliary domain (e.g., myhomecloud.xyz) for around ₹150/year. |
| 2. Link Cloudflare | Point the dummy domain’s nameservers to your free Cloudflare account. |
| 3. Create a Tunnel | In Cloudflare Zero Trust → Networks → Tunnels, generate a tunnel, choose Docker, and run the provided docker run cloudflare/cloudflared... command in Terminal. |
| 4. Map Hostname | In Public Hostname settings, route myhomecloud.xyz to http://localhost:80. |
| 5. Set CNAME | In your main hosting provider’s DNS editor, create a CNAME: Name: nextcloud → Target: myhomecloud.xyz. |
| 6. Trust Subdomain | Edit config.php on your Mac and add your domains to the trusted list. |
The trusted_domains entry in config.php should look like this:
'trusted_domains' => array (
  'localhost',
  'myhomecloud.xyz',
  'nextcloud.yourdomain.com'
),
After this, typing nextcloud.yourdomain.com in a browser routes securely through Cloudflare to your home server — without changing your main website’s DNS setup at all.
🔒 Why This Beats Commercial Cloud Storage
Running your own Nextcloud means:
- No monthly fees — pay once for hardware, run forever
- No data mining — your files, your server, your rules
- No storage limits — add more drives whenever you need
- Multi-user support — create accounts for every family member
- Full-featured — photos, documents, calendar, contacts sync, video calls
The M1 Mac handles all of this with minimal power draw, stays silent, and fits anywhere. It’s a legitimately powerful home server masquerading as a laptop.
🛠️ What You Need to Get Started
| Component | Recommendation |
|---|---|
| Host Machine | MacBook Air M1 (or any M-series Mac) |
| External Storage | 1–2 TB USB drives (WD, Buffalo, Seagate) |
| Software | Docker Desktop + Nextcloud AIO |
| Remote Access | Tailscale (easiest) or Cloudflare Tunnel |
The total hardware cost if you’re starting fresh is a used M1 Mac Air and a couple of USB drives — potentially well under what you’d pay for a year of commercial cloud storage for a family.
If you’re already on Google Drive or iCloud, Nextcloud has migration tools to pull your existing files over. Private cloud storage is no longer just for sysadmins — with Docker and Nextcloud AIO, it’s a one-afternoon project for anyone comfortable with Terminal.
🛒 Shop the Hardware
Here are the exact products used in this setup, available on Amazon:
- WD Elements 2TB External Hard Drive: amazon.com/B01apc3lc
- Seagate Expansion 1TB Portable External HDD: amazon.com/B0gKzwqgJ
- Portronics Type-C USB Hub: amazon.com/B0iPPcp8c
Disclosure: These are affiliate links. If you buy through them, I may earn a small commission at no extra cost to you.