Have you ever wanted to create your own electricity from the sun? That’s what “going solar” means! It can sound a bit complicated, especially when you hear grown-ups talk about “off-grid” systems (that’s when you’re not connected to the big power company). But I learned how to do it, and I built my own solar power system without spending a ton of money. In this guide, I’ll show you how you can do it too!
Why Go Off-Grid? A Personal Story
So, why did I decide to build my own solar power system? It all started with a cool announcement from the government in Karnataka, where I live. They said that families who used less than 200 “units” of electricity each month would get it for free! A unit is just a way to measure how much electricity you use. I thought this was awesome, but when I looked at my family’s electricity bills, I saw we were using a little too much – around 205 to 220 units every month. That meant we wouldn’t get the free electricity.
This got me thinking: what if we could use less electricity from the power company? I started learning about solar power and did some math. I found out that if I built a small solar power system (called a 1kW system), we could lower the amount of electricity we bought from the company to about 187 units a month.
This was the perfect plan! With my own solar power, we would use less than 200 units from the company, which means we’d get that electricity for free! It was like a double win: we’d have our own power source (so no more worrying about power cuts!), help the planet, and have a super small electricity bill.
Some people connect their solar panels to the power company’s lines, but those systems turn off during a power cut. I wanted to have power no matter what. So, because of the chance to save money and be in charge of my own electricity, I decided to build my own “off-grid” solar system.
The Main Parts of a Solar Power System
Every solar power system has three main parts. Think of it like a team: the solar panels, the batteries, and the “brain” of the system, which is called a Power Conditioning Unit, or PCU for short.
1. Solar Panels
Solar panels are what catch the sunlight. There are two main kinds you can get:
- Polycrystalline Panels: Think of these like a chocolate chip cookie. They’re made of many small pieces of silicon (the stuff that makes up sand) melted together. They have a bluish color and are a bit cheaper, but they’re not the best at turning sunlight into electricity.
- Monocrystalline Panels: These are more like a solid bar of chocolate. They’re made from a single, pure piece of silicon. They look black and are better at making electricity, especially on cloudy days. They cost a little more, but you get more power from them.
I didn’t have a lot of space on my roof, so I picked monocrystalline panels to get the most power possible.
2. Batteries
The sun doesn’t shine at night, so you need a place to store the electricity you make during the day. That’s what batteries are for! There are two main types:
- Lead-Acid Batteries: These are like the batteries in a car. They’re an older technology, and they’re heavy and need a little bit of care. They don’t last as many years as the newer kind, but they’re reliable and don’t cost as much.
- Lithium-ion Batteries: These are the same kind of batteries you find in your phone or a laptop. They’re lighter, last a lot longer, and can store more power. But, they are also more expensive.
Since I was trying to save money, I went with a lead-acid battery that was specially designed for solar power.
3. The “Brain”: The Solar PCU
The PCU is the super-smart brain of your solar system. It does three important jobs:
- It manages the electricity coming from your solar panels.
- It safely charges your batteries.
- It changes the “DC” power from the batteries into “AC” power, which is the kind of electricity your lights, TV, and computer use.
I looked at two popular brands, Smarten and UTL, and I picked the UTL Gamma Plus. Here’s why:
- It’s Super Efficient: It has a special power that helps it get the most electricity possible from the solar panels, even when it’s cloudy.
- It’s Easy to Use: It has a screen that’s simple to read and understand.
- It’s Tough: UTL is known for making things that last a long time.
- You’re in Control: I can tell it which electricity to use first: the free power from the sun, the power stored in my batteries, or the power from the company.
How to Connect Everything: Series vs. Parallel
This next part is super important! How you wire your panels and batteries together can change the power of your whole system. It’s like playing with LEGOs - the way you connect the bricks changes what you build. There are two ways to connect things:
- Series Connection (+ to -): Imagine you have a bunch of water hoses and you connect them end-to-end. The water will shoot out much faster (that’s like higher voltage).
- Parallel Connection (+ to + and - to -): Now imagine you have those same hoses, but you connect them all to the same tap. The water won’t shoot out faster, but you’ll get a lot more water coming out at once (that’s like higher amperage).
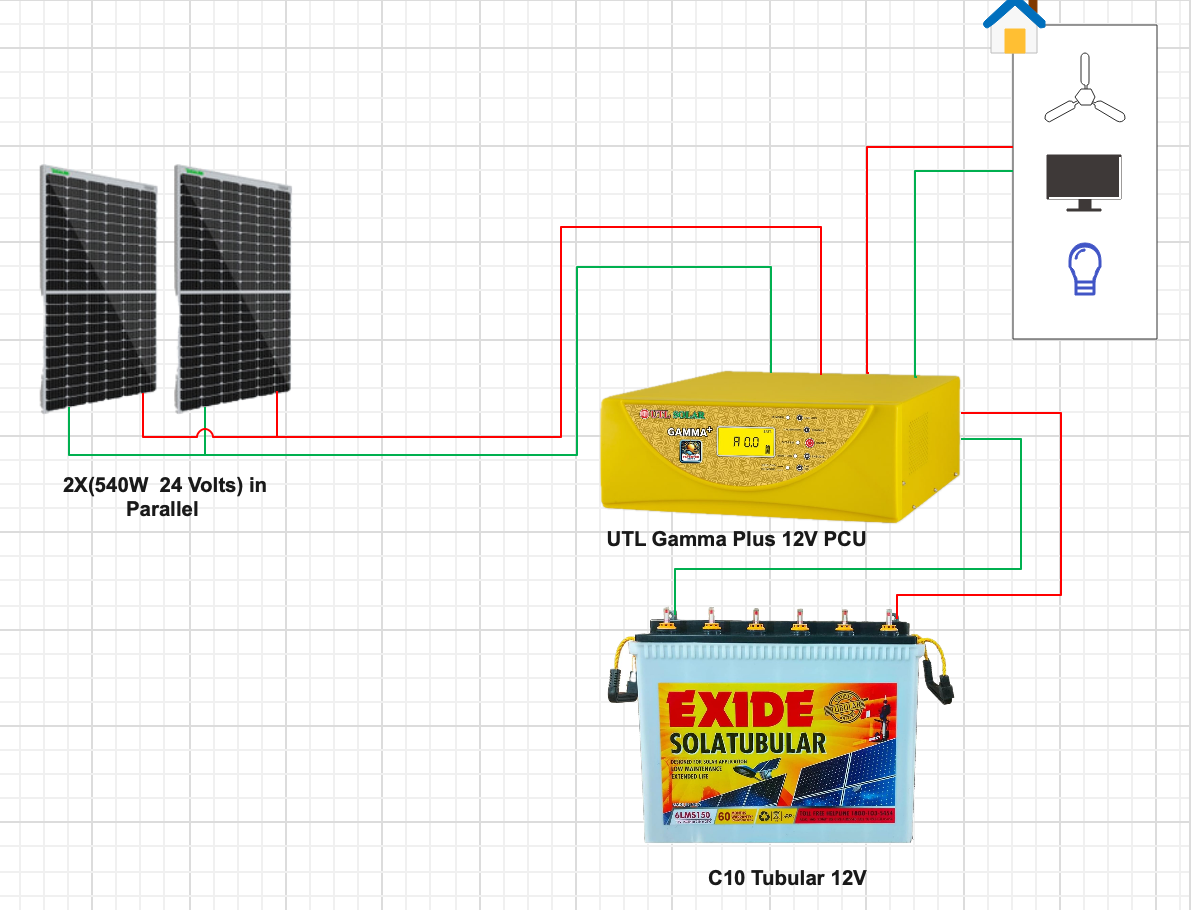
My “brain” (the UTL inverter) needed 12 volts of power to work. I had two solar panels that were each 24 volts. If I connected them in series, I would get 48 volts (24 + 24), which is way too high! So, I connected them in parallel. This kept the voltage at 24 volts, and the inverter could easily handle that and turn it into the 12 volts my battery needed.
My Final System: Parts and Costs
Here is a list of all the parts I used to build my solar power system.
| Component | Description | Price (INR) |
|---|---|---|
| Waaree 540Wp Mono PERC Panels (2 units) | The panels that catch the sun. | ₹24,598 |
| UTL Gamma Plus 1kVA-12V r-MPPT Solar PCU | The ‘brain’ of my system. | ₹14,342 |
| Exide Solar C10 Tubular Battery 150 AH | The battery to store power. | ₹15,279 |
| Galvanized Structure for Panels | The metal stand for the panels. | ₹7,500 |
| MC4 Connectors & DC Wire | Special wires for solar power. | ₹1,100 |
| Inverter Trolley | A cart to hold the battery and inverter. | ₹1,500 |
| Total Estimated Cost | ₹64,319 |
This project taught me that anyone can learn to build their own solar power system. It’s not just about saving money on electricity bills, it’s about the awesome feeling of making your own power and being in control.
Shop the Parts
Want to build your own solar power system? I’ve created a list with most of the products I used in this project on my Amazon Storefront.
See it in Action
To see how I put everything together and how it works, check out the video below.